
How to Stop Wasting Hours on Slides: A Step-by-Step Guide to MARP
I spent three hours last Tuesday fighting with PowerPoint over text box alignment. Three hours.
This is absurd, and we all know it. But most of the "AI solutions" aren't actually solving the problem. They're trying to help you think, communicate, and format all at once, which means they do a mediocre job of all three while charging you $40 a month for the privilege.
There's a better way. It's called MARP, it's free, it runs locally on your computer, and you don't need to be particularly technical to make it work. I've taught this to government officials who still print their emails—if they can do it, so can you.
Let me show you how.
What We're Building Toward
Before we dive into the mechanics, let's be clear about what you're getting. With MARP, you'll be able to:
Write your presentations in a simple text format (Markdown) that you already use when working with AI tools. No more fighting with alignment, fonts, or trying to remember which shade of blue is "on brand." You define your style once, then just write your content. The slides generate automatically as you type. Change the text, and the slides update instantly. Export to PowerPoint or PDF when you're done.
The real game-changer? AI loves Markdown. You can ask Claude to generate a MARP-compliant presentation outline from a memo or strategy document, and it'll give you your first draft in seconds. Then you fine-tune the text—not the formatting—and you're done.
Sound good? Let's get started.
What You'll Need
Three things, all free:
Visual Studio Code (VS Code) - This is a text editor. Think of it like Microsoft Word, except instead of focusing on making things look pretty, it focuses on helping you write and edit text efficiently. Developers use it for coding, but you don't need to know anything about coding. We're just using it as a very capable word processor.
MARP Extension - This is a plugin that lives inside VS Code. It watches your Markdown files and automatically turns them into slides. You won't need to install anything separately—it all happens inside VS Code.
Claude or a local LLM (Optional but Recommended) - For generating your initial slide content. Both understand Markdown natively, so they're perfect for this workflow.
That's it. No subscription needed, no cloud requirements (if you run your LLM locally), no sharing your content with some boutique AI startup that might pivot to crypto next quarter.
Step 1: Download and Install VS Code
Go to code.visualstudio.com. You'll see a big download button. Click it. The site knows what operating system you're using (Windows, Mac, or Linux) and will give you the right version.
Once it downloads, open the installer and follow the prompts. On Windows, just keep clicking "Next." On Mac, drag the VS Code icon to your Applications folder. The installer will ask if you want to do things like "Add to PATH" or "Register Code as an editor for supported file types." Unless you know what those mean, just accept the defaults.
When you first open VS Code, it looks intimidating. Lots of menus, a sidebar with icons, maybe some welcome screens. Ignore all of that for now. We only need to care about one thing: the text area in the middle where you'll write. Everything else is just optional tools you can learn later if you want.
Step 2: Install the MARP Extension
This is where VS Code starts being useful. Extensions are like apps for your text editor—they add specific capabilities. We need one called "Marp for VS Code."
Look at the left sidebar in VS Code. You'll see a column of icons. One looks like four squares with one pulled away (that's the Extensions icon). Click it. A panel opens on the left side.
At the top of that panel is a search box. Type "Marp for VS Code" and hit enter. You'll see several results. The one you want is by Marp Team—it'll have a lot of stars and downloads, so it's easy to spot. Click on it, then click the blue "Install" button. It takes about five seconds.
That's it. MARP is now installed and ready to use.
Step 3: Create Your First Presentation
Let's make a simple presentation so you can see how this works. First, we need a folder to keep your presentations. Create a new folder anywhere on your computer—your Documents folder is fine. Call it "Presentations" or "MARP Slides" or whatever makes sense to you.
In VS Code, go to File → Open Folder and select the folder you just created. The sidebar will now show your folder name with nothing in it (because it's empty).
Now let's create your first presentation file. Right-click in the empty sidebar area (or click the "New File" icon at the top of the sidebar) and create a new file. Name it something like my-first-presentation.md. That .md extension is important—it tells VS Code this is a Markdown file, which means MARP will pay attention to it.
The file opens in the main text area. It's blank. Good. Now paste in this basic example:
---
marp: true
theme: default
---
# My First MARP Presentation
A subtitle if you want one
---
## Why This Works
- You write in plain text
- MARP makes it look good
- No fighting with alignment
---
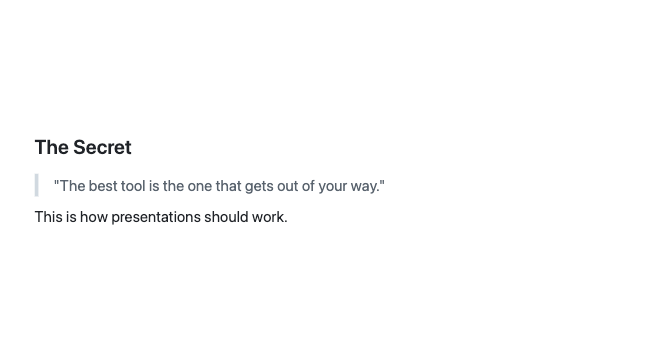
## The Secret
> "The best tool is the one that gets out of your way."
This is how presentations should work.
---
# Questions?
paul@example.com
Save the file (Command-S on Mac, Control-S on Windows). Now look at the top right corner of VS Code. You should see a small preview icon that looks like a page with a magnifying glass. Click it. A preview panel appears showing your presentation as actual slides. That gives you this:
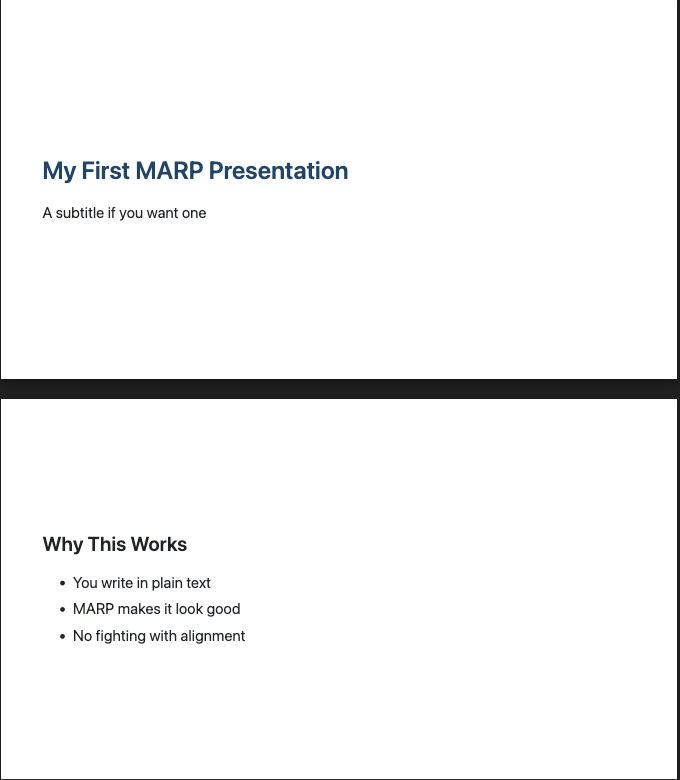
Congratulations. You just made a presentation without touching PowerPoint.
Understanding the Syntax
Let's break down what you just typed so you understand the structure. Once you get this, you can make presentations as complex as you need.
The Header Section (the part between the --- marks at the very top):
---
marp: true
theme: default
---
This tells MARP "hey, this file is a presentation, use the default theme." You need this at the start of every presentation. That's it—just copy and paste it at the top of each new file.
Slide Separators: The three dashes --- on a line by itself means "start a new slide." Everything between two sets of --- is one slide. That's how you control where one slide ends and the next begins.
Slide Content: Everything else is just normal text with some simple formatting:
#makes a big heading (title)##makes a smaller heading (subtitle)-makes a bullet point>makes a quote
That's 95% of what you'll use. Want bold? Put **text** around it. Want italic? Use *text*. That's it. You're already familiar with this if you've used AI tools—this is how Claude and ChatGPT format their responses.
Step 4: Use AI to Generate Your Content
This is where it gets powerful. Let's say you have a memo or strategy document and you need to turn it into a presentation. Don't start from scratch—let AI do your first draft.
Open Claude or ChatGPT and give it a prompt like this:
I need to create a MARP presentation from this memo. Please generate a MARP-compliant Markdown file with 8-10 slides covering the key points. Use the following format:

- Start with the MARP header (---\nmarp: true\ntheme: default\n---)
- Separate slides with ---
- Use # for titles and ## for subtitles
- Include 2-4 bullet points per slide maximum
- Keep text concise and presentation-ready

Here's the memo:
[paste your content]
Claude will generate a complete presentation in Markdown format. Copy the entire response, paste it into a new .md file in VS Code, and boom—you have a draft presentation. Now you just fine-tune the text, not wrestle with formatting.
I've done this dozens of times. The AI gets your structure 80% right on the first try, and you spend your time on the 20% that actually matters: making your argument clear and compelling.
Step 5: Customize Your Templates
The default theme is fine, but you probably want slides that match your organization's branding. This is where MARP gets clever—you can define your style once and reuse it forever.
You don't need to learn CSS (though you can if you want). MARP comes with several built-in themes: default, gaia, and uncover. Try them by changing the theme line in your header:
---
marp: true
theme: gaia
---
Save, and your preview updates instantly. Take a look at what happens when I edit my theme to a custom one:
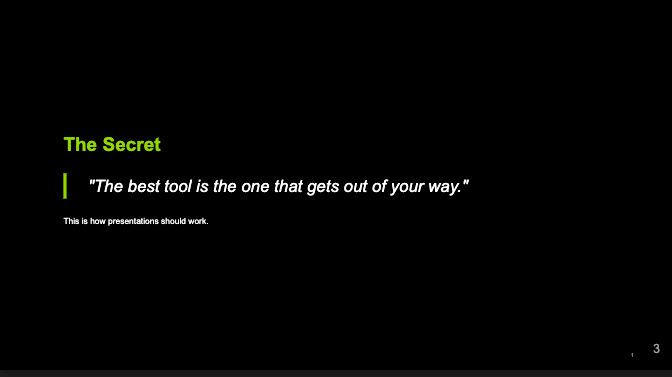
Try uncover too. One of those might be close enough to what you need. If you want to go deeper and customize colors, fonts, and layouts, MARP lets you create custom themes.
Step 6: Export Your Presentation
When you're done, you need to get this out of VS Code and into a format you can actually present. MARP can export to three formats: HTML (for web), PDF (for sharing), and PowerPoint (for maximum compatibility).
To export, open the Command Palette in VS Code. On Mac, press Command-Shift-P. On Windows, press Control-Shift-P. A search box drops down from the top. Type "Marp: Export Slide Deck" and select it. VS Code will ask what format you want. Choose PowerPoint (.pptx) for maximum compatibility with your organization.
MARP generates the file and saves it in the same folder as your Markdown file. Open it in PowerPoint. It looks like a normal presentation. Your IT department is happy. Your boss is happy. You didn't spend three hours adjusting text boxes. Everyone wins.
Common Issues and Solutions
Problem: The preview isn't showing up when I click the icon.
Solution: Make sure your file has the .md extension and that you have the MARP header at the top of the file. VS Code won't recognize it as a MARP presentation without both.
Problem: My slides look broken or the formatting is weird.
Solution: Check your --- separators. They need to be on their own line with nothing else—no spaces before or after. Also make sure you have a blank line before and after them.
Problem: The AI-generated content has too much text per slide.
Solution: Tell the AI to be more concise. Use a prompt like: "Reduce each slide to maximum 4 bullet points, maximum 10 words per bullet." Or just edit it yourself—that's the whole point of having it in plain text.
Problem: I need speaker notes.
Solution: MARP supports them. Add a comment-style note anywhere on a slide like this:
---

## Slide Title

Main content here

<!--
These are my speaker notes. The audience won't see them,
but they'll export to PowerPoint's notes section.
-->
Why This Actually Matters
Look, I get it. Learning a new tool feels like overhead. You already know PowerPoint, even if you hate it. Why switch?
Here's the thing: PowerPoint isn't designed for how we actually work anymore. We draft in documents, we collaborate with AI, we iterate quickly. PowerPoint wants you to spend time in PowerPoint, fiddling with layouts and animations that nobody cares about. It's optimized for the tool's needs, not yours.
MARP flips this. You write in the same format you already use with AI tools. You store your presentations as simple text files that work with all your existing backup and version control systems. You can search them, diff them, track changes properly. And when you need to make a change, you edit text—which is fast—instead of hunting through menus and dialog boxes.
I've used this whenever I can now. The time savings are real. More importantly, I spend my time on the content—on making my argument clearer, my data more compelling, my recommendations more actionable. That's what actually matters.
The formatting? MARP handles it. Every single time.
Next Steps
Start simple. Take a presentation you need to make this week and try doing it in MARP. Use the AI prompt I gave you to get your first draft. If you hit issues, the MARP documentation is actually readable (rare for technical tools), and the community is helpful.
Once you've made two or three presentations this way, you'll never want to go back. I certainly haven't. That three-hour PowerPoint nightmare from last Tuesday? With MARP, it would've been twenty minutes.
Your Monday mornings just got a lot better.